Building a Secure Authentication Server and API Gateway for Microservices with OAuth 2.0 and JWT
Step-by-Step Guide to Setting Up Token-Based Security, Scopes, and API Gateways for Scalable Microservice Architectures
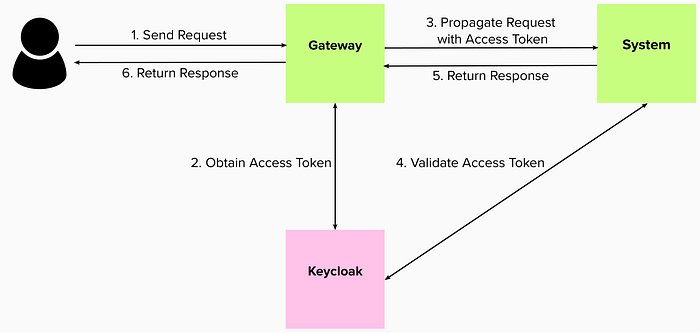
Creating an authentication server that issues tokens with scopes and acts as an API gateway for your company’s microservices involves a secure, layered setup that includes an authentication server, API gateway, and integration with all your microservices. Here’s a step-by-step outline to build this system:
API Gateway Simple Example

1. step — Define the Authentication Server
🔒Choose an Authentication Protocol:
Opt for OpenID Connect (OIDC) on top of OAuth 2.0, which supports token-based authentication with scopes.
OAuth 2.0 is commonly used for issuing access tokens, while OIDC adds a user information layer (useful if your gateway needs user details).
🔒Use an Identity Provider (IdP):
Set up a dedicated identity provider like:
Keycloak is an open source identity and access management solution. It provides user federation, strong authentication, user management, fine-grained authorization.
Okta is an American identity and access management company based in San Francisco. It provides cloud software that helps companies manage and secure user authentication into applications, and for developers to build identity controls into applications, website, web services, and devices.
Auth0 is a platform companies and web developers use to verify a user’s identity before giving them access to websites and applications.
or a custom OAuth 2.0/OIDC server (e.g., using Node.js with libraries like node-oidc-provider or Authlib in Python).
🔒Configure Scopes and Permissions:
Define scopes (permissions) in the IdP to represent access levels to various resources. For example, scopes like read:orders or write:orders could map to different API access levels.
2.Step — Set Up JWT for Token Management
🔒JWT Token Issuance:
Configure your IdP to issue JSON Web Tokens (JWTs) for access. JWTs are signed, tamper-resistant tokens that include claims about the user and scopes.
🔒Define Token Structure:
Set token claims to include user roles, scope, issuer (iss), audience (aud), and expiry (exp). For security, ensure that tokens have short expiry times and that refresh tokens are securely managed — More about tokens here.
🔒Signing and Verification:
Use RS256 (RSA-based signing) or ES256 (Elliptic Curve) to sign the tokens. The gateway can verify token signatures using the public key from the IdP.
3. Step — Configure the API Gateway
🔒Integrate with IdP:
Use an API gateway like Kong, NGINX, or AWS API Gateway and configure it to authenticate incoming requests using JWT tokens. These gateways have plugins to verify JWTs.
🔒Define Authentication Policies:
Use token scopes to define route-specific access controls. For example, routes that handle order creation can require the write:orders scope.
🔒 Implement Rate Limiting and Throttling:
This prevents abuse by setting API call limits per token and enforcing quotas.
4. Step — Secure Communication
🔒Enforce HTTPS:
Ensure all traffic to and from the gateway and services uses HTTPS for secure transmission.
🔒IP Whitelisting and Firewalls:
Restrict access to your authentication server and microservices by whitelisting IP addresses and using firewalls.
🔒Use Mutual TLS (mTLS) for Service-to-Service Communication:
For enhanced security, especially in sensitive transactions, configure mTLS so both client and server validate each other’s certificates.
5. Step — Integrate with Microservices
🔒Forward JWT Claims:
Configure the API gateway to forward the validated JWT claims to microservices, either in headers or via a custom claim in the JWT token.
🔒Service-Level Authorization:
Each microservice should check the user’s scopes against its internal permission rules for additional security. For example, an orders service could ensure that users with only the read:orders scope cannot perform write operations.
🔒Implement a Token Revocation Policy:
Ensure that services periodically validate tokens for active status, especially if using long-lived access tokens. Periodic token validation with the IdP can address revoked or expired tokens.
6. Step — Monitor and Maintain
🔒Log and Monitor Authentication Attempts:
Collect logs for authentication events to monitor for anomalies.
🔒Audit and Rotate Keys Regularly:
Ensure that signing keys used for JWTs are rotated periodically, following a secure key rotation policy.
🔒Plan for Scalability:
Choose load balancers and API gateway configurations that can scale with your company’s needs, including regional replication if needed.
Example Tools and Technologies
🔒Authentication Server: Keycloak, Auth0, or a custom OIDC server (Node.js with node-oidc-provider)
🔒API Gateway: Kong, NGINX, AWS API Gateway
Database (for user management): PostgreSQL or MySQL if managing users locally
🔒Service Intercommunication: gRPC or REST over mTLS for inter-service communication
Hands-On Practice
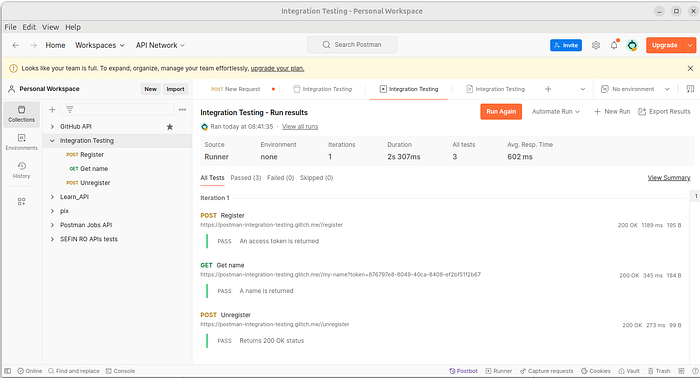
To explore API integration testing, Postman offers a dedicated Integration Testing Collection. This setup allows you to test API endpoints, validate response structures, and handle error scenarios within a sandboxed environment. The collection uses postman-integration-testing.glitch.me as the test server, where you can safely make requests and verify response data without impacting live systems.
🔒 Access the Collection:
Use one of the available Integration Testing Collection links, where you’ll find pre-configured requests to simplify setup.
🔒Fork and Run Tests:
Fork the collection to your workspace. Postman’s scripting tools allow you to write JavaScript using ChaiJS BDD syntax, making it easy to add assertions for responses, headers, cookies, and more.
🔒Examine Results in the Console:
For detailed analysis, Postman’s Console provides logs of each request and response, helping you debug and verify the flow of information between requests.
This integration testing setup supports automated testing, helping you ensure that all services are well-connected and functioning.
For further reference on console output, consider viewing my own test console here.
POST https://postman-integration-testing.glitch.me//register
200
1189 ms
POST //register HTTP/1.1
User-Agent: PostmanRuntime/7.42.0
Accept: */*
Cache-Control: no-cache
Postman-Token: afacd8c8-2113-4538-8e51-973f65c09e60
Host: postman-integration-testing.glitch.me
Accept-Encoding: gzip, deflate, br
Connection: keep-alive
Content-Length: 0

HTTP/1.1 200 OK
Date: Mon, 28 Oct 2024 12:41:36 GMT
Content-Type: application/json; charset=utf-8
Content-Length: 48
Connection: keep-alive

{"token":"876797e8-8049-40ca-8408-ef2bf51f2b67"}

GET https://postman-integration-testing.glitch.me//my-name?token=876797e8-8049-40ca-8408-ef2bf51f2b67
200
345 ms
GET //my-name?token=876797e8-8049-40ca-8408-ef2bf51f2b67 HTTP/1.1
User-Agent: PostmanRuntime/7.42.0
Accept: */*
Cache-Control: no-cache
Postman-Token: 590e2844-e027-430b-bf81-c0dc36826fc1
Host: postman-integration-testing.glitch.me
Accept-Encoding: gzip, deflate, br
Connection: keep-alive

HTTP/1.1 200 OK
Date: Mon, 28 Oct 2024 12:41:37 GMT
Content-Type: application/json; charset=utf-8
Content-Length: 37
Connection: keep-alive

{"name":"thundering-pathetic-growth"}

POST https://postman-integration-testing.glitch.me//unregister
200
273 ms
POST //unregister HTTP/1.1
Content-Type: application/json
User-Agent: PostmanRuntime/7.42.0
Accept: */*
Cache-Control: no-cache
Postman-Token: 889b7fa4-beb1-4b87-888e-102e1d194d06
Host: postman-integration-testing.glitch.me
Accept-Encoding: gzip, deflate, br
Connection: keep-alive
Content-Length: 55

{
"token": "876797e8-8049-40ca-8408-ef2bf51f2b67"
}

HTTP/1.1 200 OK
Date: Mon, 28 Oct 2024 12:41:37 GMT
Content-Length: 0
Connection: keep-alive
That wraps up my breakdown of API Gateways for scalable microservice architectures!
If you found this helpful, feel free to show some support with a clap or by sharing your thoughts in the comments — I’d love to hear from you 🤗.
Credits & References
API Gateway with an Example of a Receptionist by MOHIT MISHRA
OAuth 2.0 Explaned in a Graph 👌 SVG
Demystifying OAuth 2.0 Flow: Unleashed — With Google Authentication (Dockerized) — oauth2-node-api-v2 by j3
Succinct TODO list:

1- Authentication Server: Set up an IdP (e.g., Keycloak, Auth0) with OAuth 2.0 and OIDC to issue JWTs and define scopes (e.g., read:orders, write:orders).

2- Token Management: Configure JWTs with user roles, scope, expiry, and secure signing (RS256/ES256).

3- API Gateway Setup: Use Kong, NGINX, or AWS API Gateway to validate tokens, enforce scopes, rate limit, and throttle.

4- Secure Communication: Enforce HTTPS, IP whitelisting, and mTLS for service-to-service security.

5- Microservice Integration: Forward JWT claims, validate permissions per service, and periodically verify token status.

6- Monitoring and Maintenance: Log activity, rotate keys, and configure gateways to scale with demand.